in the 'normal world' I would be running workshops
with Easter themes and inspiration. So, with that in
mind, I wanted to share some of those projects with you,
which you can choose to make and schedule into your
creative time, now that we are all socially distanced
with hours to play!
I understand what a mental struggle it is to adjust to this
new confinement and adapt to conditions of crisis! But
escaping into creativity, making a simple wire decoration,
or a pair of hammered wire earrings, can provide you
with moments of respite! It cuts out the outside noise ...
made as a pendant design. You fill find this project on an
older blog that I featured on 24th March 2018. Here's a link
to the BIRD NEST.
Another fun project that I have previously featured is this little
basket pendant, which can fit one mini egg, or as above, I have
filled it with coloured wire caged beads. You can find this on
a previous blog, dated 3rd March 2016. Here's a link to the
BASKET.
You can always crank the scale of the basket up in size and
weave some beads alongside the wires ...
Or, create your own unique version (based on flower shape)!
So, do sift back over my past Easter blogs... They will provide
plenty of wire inspiration to the days ahead!
The Daffodil card is there:
Which could also be created as a decorative hair grip:
And how about Bunny Earrings to wear on Easter Sunday?
Talking of which, I am now going to share a simple bead and
wire project that could be done with the kids.
Here are my ALIEN BUNNY CHARMS!
They have been mutated by the virus and hence, you don't
have to worry that they look like Easter Bunnies!
All you need is 0.8mm (20-gauge wire) and 2 beads (one for
the 'head' and a larger one for the 'body'). Plus your usual
pliers (round, chain nosed and cutters) and if possible
a steel block and Whammer hammer!
STEP 1
Choose your 2 beads and some 0.8mm wire.
STEP 2 (EARS)
Bend the wire around your round nosed pliers to create the first
long 'ear'.
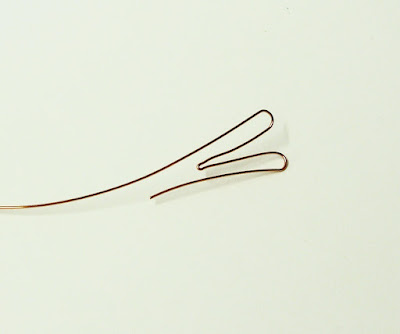
STEP 3
As shown above ... Bend the wire back in the opposite direction.
STEP 4
Now, form the second long 'ear (approximately the same height
as the first).
STEP 5
Use the end of the wire to secure around the main stem, bringing
the 2 long 'ears' together.
STEP 6
Place the end loops of the 'ears' on your steel block and hammer
to flatten, spread and work harden.
STEP 7 (ARMS)
Cut another length of 0.8mm wire (say about 4"-10cm). Place
your round nosed pliers at the centre of the wire and wrap the
wire around to form a tiny circle.
STEP 8
Depending on how loopy and long you wish the 'arms' to be,
bring the ends of the wire around your round nosed pliers,
back towards the central, tiny circle ...
STEP 9
Secure the ends of the wire, next to the tiny central circle and cut
off any excess wire. Neaten the ends with the tips of your chain
nosed pliers.
STEP 10
To toughen the unit, hammer the looped ends of the 'arms' on
a steel block with the steel end of your Whammer hammer.
STEP 11 (ASSEMBLE ALL UNITS)
Now, you are ready to assemble all the units together! Begin, by
threading your smaller 'head' bead onto the main stem 'ear' wire.
Followed by the 'arms' unit, which is threaded through the tiny
central circle ... and finally, the larger 'body' bead.
STEP 12 (FEET)
Push all the units tightly together and using your round nosed
pliers, form a 'foot' loop close to the 'body' bead.
STEP 13
Wrap the wire around the top of the first 'foot' ready to form the
second one next to it.
STEP 14
Secure the end of the wire around the top of the 'foot' loops
and cut off any excess. Neaten the end with the tips of your
chain nosed pliers. Spend a little time, readjusting and
shaping the arms, ears and feet and with a permanent marker,
you can draw a little face on to the 'head' bead!
These little bunny charms can be used to decorate your home:
(1) Hide them for a treasure hunt with your eggs. (2) Make them
to represent each member of the family! (3) Paint a twig white,
stick in a vase and suspend with these alien bunnies, chicks and
egg decorations! (4) Create them as keepsakes for a friend, or
family member who is 'fighting on the front line' and helping us
all to keep safe, as well as save lives!
And if you have multicoloured seed beads to hand, these
little beaded egg decorations are also fun to make!
I will posting project videos on my FACEBOOK page
to keep you creatively motivated and inspired. And
if you have request for designs and questions about
wirework, do message me as I always happy to help
where I can!
Enjoy working on these Easter themes!


No comments:
Post a Comment