Tuesday 29 November 2016

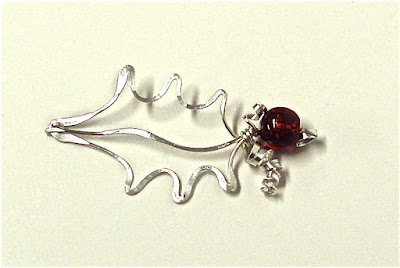
Xmas Holly Pendant

It is with immense regret, that I have to announce that I
wont be continuing, with what I hoped was going to be a
series of Wire Jewellery shows on the Craft Channel! 
I can't go into all the details, as I don't have any insider
knowledge, except to say that the Channel were very suddenly
faced with their main investor pulling out and are now hopeful in
getting a new backer, so that they can resume with more
jewellery shows! So until such time, ... I will have to go
job hunting again ... Any offers, will be gratefully considered!

As life is a bit prickly this month (and we're heading into
the festive season) here's my latest Christmas necklace,
involving making a spiky holly leaf!

So, ding dong merrily on wire! Here's how to create a Xmas
HOLLY LEAF:

STEP 1


Working directly from a 0.8mm spool of wire, place your round
nosed pliers about 1" (2.5cm) from the end, and form a curve.
Use your chain nosed pliers, to pinch the wires at the tip of the
curve. Then, form more curves with a longer one for the pointed
end of the leaf (as shown above).

STEP 2


Repeat the same, to create the opposite side of the leaf frame.
Cut the wire from the spool leaving a tail projecting.

STEP 3


To secure the frame, wrap one wire around the other.

STEP 4
Using your Whammer on a steel block, hammer only the outer
tips of the frame, plus the end of the projecting wrapped wire
(where arrow shown).

STEP 5


Cut approx. 6" of 0.8mm wire (or, at least enough to go down the
centre of the leaf with about 3" extra). Secure the wire around the
top, with one part becoming the central vein of the leaf and rest
projecting out at the top.

STEP 6


*(If you wanted to thread beads onto this central wire, this is the
time to do it). Or, just secure the end around the top. As for the
projecting wire, use your Whammer to flatten on a steel block
(except for the very end tip).

STEP 7


Use the tips of your round nosed pliers to curl the hammered
wire at the top of the leaf into decorative curly coils.

STEP 8


Thread a bead onto the central stem and form a link at the
top of the bead.

That's your holly leaf made and it's now ready to put onto a chain!
However, I am going to give you, two projects in one ... so, read on ...

STEP 9


You can suspend the holly leaf from a flat bauble decoration:
create this, by wrapping 1mm wire around a circular mandrel,
leaving the ends to overlap by about 1cm-ish.

STEP 10


Using the tips of your round nosed pliers, curl the very ends of
the circle into links and twist them 90 degrees to the frame.

STEP 11


Decorate the inside of your 'bauble' decoration with spirals, or
threaded beads. Get creative and go freestyle! Here's what I did ...

STEP 12


I created one main 'S' shape to fit my circular frame ...

STEP 13


... and then kept adding and binding in more where necessary,
using 0.4mm wire to secure where they touched. You could use
more beads or coloured wires ... just fill and decorate the inside
of the circular frame.

STEP 14


Finally, suspend it from a chain or ribbon (as a tree
decoration!) or, as a lovely long pendant necklace!

I hope you can use this inspiration to make your own
decorative, festive jewellery!

(Psssssst! Bookings for Wire Jewellery Workshops for all abilities
make perfect Xmas presents! Go on, treat yourself, especially
if you live near Tonbridge in Kent!)
www.wirejewellery.co.uk



Monday 7 November 2016

ANGEL DECORATION

The heat of the run-up to Christmas is now on!
Especially if you make to sell your jewellery and
also, if you want to start to plan to make your own
unique handmade gifts and decorations for family
and friends!


I've also got some very, very exciting
'breaking news': ....
I'm back demonstrating on TV with my own wire
jewellery show every month starting on
18th NOVEMBER
at 12pm and 5pm
on (drum roll ...)
THE CRAFT CHANNEL!!!
Freeview 88, Sky 679, Freesat 818
Or, you can watch it LIVE ONLINE (with a 7 day catchup!)

Sooooo.... get those Whammers out and ....
"Let's get hammered!!!" (that's my new catchphrase!)

*~*~*~*~*~*~*~*~*~*~*~*~*~*~*~*

For this month, I thought I would share a popular
project, that I often teach in my Xmas workshops, 
so here goes:

STEP 1


Depending on the size of your decoration, cut a reasonable length of 
0.8mm wire.  I used about 12" (30cm).  I placed my 8mm bail maker
pliers at the centre of the length and pinched the wires just under the
rounded end, so that the wires met and joined together to form a complete
circle. (*If you don't have bail makers, just use a pencil or pen as a
mandrel).

STEP 2


Using your chain nosed pliers, follow the wire structure shaping
shown above, to form a short (neck) stem of double wires. Then bend 
each of the wires out at right angles (for the shoulders) and then back
down to form the (body) shape, curving it out slightly with your fingers.

STEP 3


Decide on the overall length of the 'body' and place your round
nosed pliers on each of the side wires and form a loop, bringing
the wires in towards each other.

STEP 4


Create a large open spiral out of one of the wires
at the base of the body frame. *Optional, If you like 
hammering, (and let's face it, who doesn't?!), you can 
hammer the spiral on a steel block and any other part
of the structure to work harden it.

STEP 5


Use the remaining wire to secure around the base of
the frame, wrapping it around the other, to secure ...


STEP 6


Use any leftover projecting wire to form a small spiral, which can be flattened over the wrapped wire beneath.


STEP 7


Now the colourful fun begins! Choose a selection of beads to
wire into the space within the frame. Use 0.4mm wire and
connect with multiple wraps to  decorate your angel!

STEP 8


Get Creative! Decorate the frame as you wish!
You can also bind in a 'head' bead and more beads at the base.
Each angel you make can have it's own particular colour
palette and design.


STEP 9


Now for the WINGS! Depending on how large you wish
to create them, wrap some 0.8mm wire twice around a circular
mandrel. My mandrel was approximately 1.5" (4cm).

STEP 10


Remove the 2 loops from the mandrel, and bind to secure,
leaving a tail of at least 6" (15cm). Place the tips of your
chain nosed pliers near to the opposite side of the join
and 'tweak' both wires to form an indent in both of
the wire circles.

STEP 11


Separate the indented circles out (like opening a book)
and form a large circular (halo) out of the projecting wire.
*I also recommend Whammer hammering the outer parts
of the wing frames to work harden them.

STEP 12


And, whilst you're partaking in Whammer therapy, give
the circular halo a good old bash on your block and
then use the dapping head on the Whammer, to create a
little extra texture and shimmer!
(Releasing all those negative vibes!!!)

STEP 13


There are many ways of decorating the wings: such as
beading them or wiring in scrolls ... but  here's a quick
version that you can do:
Cut 2 x 1 metre lengths of 0.3mm wire (any colour of your choice)
and SCRUNCH and roll them in your hands (it's what I technically
call: 'meatballing'), to form 2 balls of wire.

STEP 14


Flatten and stretch out the balls of wire and with your fingers,
shape each of them to fit the inner space of the wings.  Cut
a length of 0.3mm wire and 'sew' the scrunched wire in place around
the outer frame with small stitches.

STEP 15


Once the scrunched wire is in place and fills the wing spaces,
gently Whammer them with the nylon head to compress
together and work harden.

STEP 16


Now, all that's left to do is to connect the wings to the
body with some 0.4mm wire!


You can suspend the top of the halo from a handmade
chain and hook (as above) or a ribbon that blends in
with your bead selection!

I do hope that you've enjoyed this Angel Decoration Tutorial?
Just use your creativity to make your own versions
with different coloured beads and wires ... as the whim
takes you!


I used knitted wire, for the wings in this pink version and tissue
paper for my white and crystal version ...


Wednesday 19 October 2016

SPIDER TUTORIAL

HALLOWEEN SPIDER

If you suffer from arachnophobia, you might want to
look away! However, it's here by popular demand, 
just in time for Halloween ...

I personally have no problem with spiders, but if you do,
I have read that you can make your own homemade deterrents:
"Spray peppermint oil around your windows and doors to deter 
the spiders, as they don't like the fragrance. You can make 
this spray by mixing 10 to 15 drops of peppermint oil with water. 
A spray bottle will allow you to dispense the solution with ease."
And, if you don't have peppermint oil, white vinegar, is also
quite effective (but your house might start smelling a bit like a 
fish and chip shop!). 

Anyhow, back to creating this 'fun' spider! 
Pliers, Wires, Beads and Ready Steady GO ... !!

STEP 1


Create a spiral out of 0.6mm wire (check that the gauge, 
you use, can be threaded with the small beads you are
going to use for the 'body'). Cut from the spool, leaving 
about 6" (15cm) projecting.

STEP 2 


Stretch the spiral out and start threading with your
small beads, pushing them around the spiral coils, 
so that they fill and cover the entire coil.

STEP 3


Continue threading the small beads onto the
projecting stem, until you only have about
2" (5cm) of bare wire protruding at the end.

STEP4


Take the end of the wire and start forming a tight
spiral and then, using your fingers, continue spiralling
the wire around until it sits next to the first beaded
coil. (P.S. This is also a technique for making a cool
BEADED CAGE BEAD!).

STEP 5


LEGS: to make these, cut 4 x 5" (12.5cm) lengths
of 0.6mm wire. Bind the centres together with 0.4mm 
wire. Space the wires out on each side of the binding
and begin threading alternatively with bugle and seed 
beads ... (I used 7 bugle beads interspersed with 7 
seed beads, but it's up to you how long you wish to make 
your spider's legs!).
To secure the beads on each leg, create small tight
spirals at the very ends. Repeat for each of the 8 legs.

STEP 6


To form the legs framework: use the tips of your chain- 
nosed pliers to create a bend on each leg (mine was on 
the 3rd bugle bead along). *Be careful not to crack the 
beads as you bend, so add some slack, by unwinding 
the spiral feet at each end.


STEP 7


Cut a workable length (at least 6"- 15cm) longer
than the beaded body length). Thread this through
the centre of the beaded body, securing it with a
small spiral headpin at the rear.

STEP 8


Wrap the wire extending from the beaded body around
the centre of the legs unit to secure both together. 
Extend and straighten the remaining wire centrally from 
the body/leg framework. 

STEP 9


Thread the extending wire with your chosen 'head'
bead and leaving just under an 1" (2.5cm) protruding
from the head bead, bend the wire and double it back
towards the bead.

STEP 10


Squeeze the doubled wires together with your flat
nosed pliers, so that they run parallel and bend
the wire out again to form a 'V' (to create antennae).
Fold the second wire back and secure by wrapping
by the 'head' bead. Cut off any excess wire and
neaten the end.

Finally, Using the tips of your round nosed
pliers, curl the ends of the doubled wires around.


I hope you have enjoyed this tutorial and do post your
pictures up on my Facebook page to show your
your own versions! These can be used as ornaments,
or suspended from monofilament or black thread
to decorate your Halloween party!


Saturday 1 October 2016

Skeleton Tutorial

HALLOWEEN 
... is hovering in the dark corners with the
spiders and ghouls. The witches hats and
brooms and lots and lots of green slime and
red goo!


I am always amazed how super-charged and media-driven it has
become with consumers, spending massive amounts of money on
costumes and related merchandise!

It's just an excuse for a dressing up party and if you're a creative
soul, the cost should be minimal, as you can make your own costumes,
create your own decorations and bake your own delicious pumpkin pies!

I hope you like my SKELETON TUTORIAL
(although, not for the faint hearted!). It can
be scaled up or down, as a decoration, pendant
or, make 2 as a pair of shoulder-dusting earrings!

STEP 1 (SHOULDERS)


For a small decoration, cut approximately
3"(7.5cm) of 0.8mm or 1mm wire. Place your
round nosed pliers at the centre of the
length and cross the wires over on each side,
to form the central loop. Curl each of the
ends (in towards each other)on each side.

STEP 2 (ARMS)


Cut 2 x 1.5" (4cm) and 2 x 2.5" (6.5cm)
lengths of wire. Straighten them out and
using your round nosed pliers, create loops
on each side on the shorter lengths and a
link and spiral (for the hands) on the
longer units.

STEP 3 (HIPS)


Cut approximately 2.5" (6.5cm) of wire and 
create a similar unit to Step 1.  You can choose 
to have the side loops curling in, or outwardly,
it's your choice!

STEP 4 (LEGS)


Follow the same method as Step 2,
I used about 2" (5cm) x 2 of wire for the 
upper part of the legs and 3" (7.5cm) for 
the lower part with spiral feet. 

STEP 5 (TORSO - 1)


Make a large spiral (about 1" across)
and cut from the spool, leaving a projecting 
tail of about 1.5" (4cm).

STEP 6 (TORSO - 2)


Using your round nosed pliers, create a
loop at the end of the projecting wire
and then continue to curl the wire into
a spiral (in the opposite direction to
the main coil). It's just like making a
bead cage!

STEP 7 (TORSO - 3)


Fold the top small spiral over the larger
one (aligning the centres) and stretch the
coils out to form the ribbed torso!

STEP 8 (HEAD - 1)


Create a tight spiral and once it is
the size desired for the head of your
skeleton, create a link with your round
nosed pliers.

STEP 9 (HEAD - 2)


Cut the wire from the spool, but leave 
enough to bring around the side of your
spiral and to make a second link, 
opposite the top one in Step 8.

STEP 10


Assemble and connect your skeleton in
any order you like ... I started by
attaching the upper arms (Step 2) 
together and onto each side link of
the shoulders (Step 1).

STEP 11 


Now, attach the head (Steps 8-9) to the 
central link of the shoulder unit (Step 1).

STEP 12 (BACK BONE)


Cut a length of wire and thread this
through the centre of the spiralled
torso, creating a loop with your round
nosed pliers at the top and base of the
torso (Steps 5/6/7)

STEP 13


Connect the legs (Step 4) together and
attach to the outer loops of the hips
(Step 3). Now attach to the base loop of
the torso.

STEP 14


And you're there! Attach the top part of
your skeleton to the base and your skeleton
will start to dance!


For a final finish, you can glue on some
flat back diamante 'eyes' and some tiny
pearl seed bead 'teeth'. Or, use some paint
and a fine brush, to paint on a skull face!

There are plenty more decorations you can create out of
wire ... here are a few more that I created to inspire you:


HAPPY WIREWORKING!

... I'm off, on my broomstick ...