Monday 13 December 2021

HOLLY LEAF NAPKIN RING tutorial

As this very strange and difficult year comes to a 

close and Christmas festivities go into as much

swing as they're safely allowed to ... I thought

I would share this Holly Leaf tutorial with you!


I have always loved creating wire and beaded

tree decorations and this year, I had a quite a few

commissions for festive napkin rings!


If you're interested in creating your own

handcrafted napkin rings for your table

this year, I have made a tutorial using beautiful

gemstone beads from CHALMERS GEMS 

which you'll find on a link down below and on 

my YouTube Channel.


Not only will you learn how to create the holly

leaves, but also my version of Mistletoe! And you

can always use the same technique to create these 

as tree decorations.

Here's a link to my Xmas Pin Board on 

PINTEREST! 


Whatever your choice of colours, you will find

faceted crystals, glass beads, as well as beautiful

gemstones to add colour and style to your pieces!


Sending much love and good wishes to all 
for healthy and safe Christmas! XXX


Here's a link to the tutorial created with 
Prehnite and Moonstone gem beads, 
available from:

______________________________


Wednesday 13 October 2021

CARD HOLDER Tutorial

DATE FOR YOUR DIARY!!

This FRIDAY 15th October at 6pm, 

I will be doing a 'Live' Tutorial with 

CHALMERS GEMS!


I have been collaborating on a project

with them, using some beautiful Selenite 

shaped stone bases which they will have

for sale, ready to purchase online, on

Friday ... so DO JOIN US for this event!


I had no previous knowledge of Selenite,

but having worked with it on this project, I

have fallen in love with its pearly lustre!

It's like a white cloud, but in hard form. 

Chalmers Gems also supply a USB light

for the bases to sit on, which shows off the

translucency and crystal formation within each

individual stone.

If you're crystal healer, I'm sure you'll

be aware that it promotes, peace and calm,

clears blocked energy and is the perfect

stone to gift to a loved one (or keep in your

house!).


The design challenge I had, was to come up

with a gift idea using the base stone shapes.

They were too big and heavy for jewellery, 

plus I didn't want to place something on top of them, 

such as a tea-light, as I worried about damaging 

the surface of the stone. However,  in the end,

after a lot of brain scratching, I came up with this 

Card or Photo Holder which makes the ideal gift 

for an office (holder for business cards, to-do lists 

or even a typed slogan affirmation). Alternatively, you 

could use it to hold a special greeting or invitation card. 

But primarily, it's perfect for a photo of a loved one, 

old or young!


Chalmers Gems are known for their value and

quality, so do watch the tutorial on Friday in order

that you can also make your own version for your

Christmas and all special occasion gifts this year! 

As they will have these beautiful Selenite bases, 

plus a range of beautiful semi-precious chip beads 

on sale for you to purchase. 

Then all you will need is your wire working

tools and some 0.4mm and 1.6mm aluminium wire 

to create the structure of the stands.


Here are the ideas I will share with you in my

live tutorial on Friday:


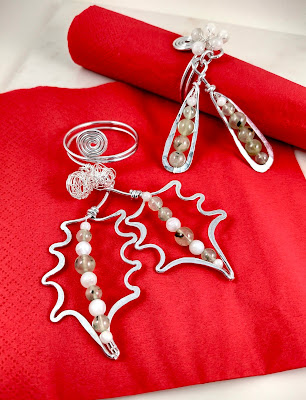
This stand has some 2mm sparkling faceted Garnets

and 2mm white Howlite, with clear round crystals

in between.


A photo can be slotted in between the spiral and

the Selenite Star is not just for Christmas!


Above, I have used Apatite chips with some Howlite

beads to create cluster rays.


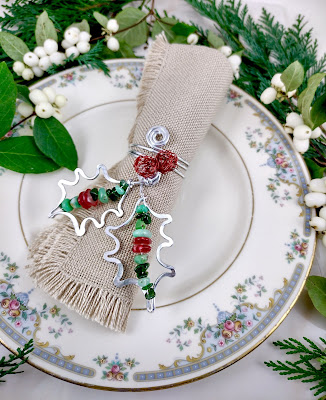
If you sell your jewellery, this works well for

your business card holder. And for an office, 

you can place several cards within the spiral

to keep your contacts in view!


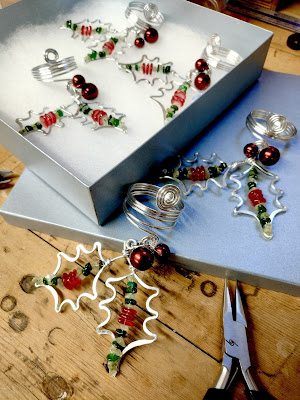
Here 'I went to town' with a flower theme idea,

using red Garnet, with the leaves created out

of 2mm faceted Chrome Diopside beads. 


It's perfect for as a large card holder, but when

not in use, you can just enjoy the flower decoration!


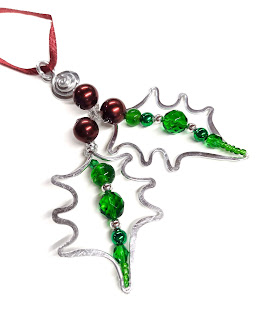
Above, I have used Chrysoprase gem chip beads

together with some 2mm multi- coloured

Moonstone beads. Again, it works well with

any of the shaped Selenite bases ...


... but could also hold a Birthday, Wedding

invitation or Christmas card!


So please do join me with CHALMERS GEMS

for this live event, this coming Friday at 6pm

to obtain the materials needed and be shown

how to create these wonderful card holders!

And here's a TUTORIAL to show you how!


Friday 17 September 2021

MASK Tutorial


Masks have had a place in our cultural 

history and heritage since ancient times, 

specifically in Africa. They were used in ritual 

ceremonies to communicate to ancestral spirits. 

And down the ages, they have also been used in 

entertainment, as well as practical purposes for 

protection. As we well know today, with the 

Covid health crisis!


So I thought I would design a MASK pendant, which you could adapt and change as you wish, by adding your own details and components.  

Not only is this apt as a talismanic protection piece, but I think it would also work well as a Halloween decoration, which is approaching  next month!


STEP 1 (The Frame)


Depending on the size of pendant you wish to 

create, cut a piece of wire (0.8mm/1mm gauge). 

Fold in half and shape like a fish!


STEP 2


Once you have established the shape and size, 

straighten one of the extending wires and cut the 

other end, leaving just enough to form a link to secure 

around the top of the frame stem.


STEP 3 (Eyes and Nose)


To create the nose and eyes, cut a length of 

0.8mm wire (my pendant is about 7cm x 3cm 

and I used about 15cm). Hold the centre of the 

length in your flat nosed pliers and bend the 

wires up on each side, keeping them straight 

and parallel. Trim the very ends to the 

same length.


STEP 4


The length of the 'nose' is your choice, it can be 

long, short, fat or thin! Bend each of the extending 

wiresout on each side to form the eyes.


STEP 5


Bend each of the extending wires back in towards 

each other, trying to keep each side as symmetrical

as possible.


STEP 6


Place the tips of your round nosed wires at the 

very end of each of the wires and curl them 

around to form tight spirals, creating the 'eyes' 

on each side.


STEP 7 (The Mouth)


Measure fold and shape a length of 0.8mm wire 

in half to form the 'mouth' of your mask. Leave 

just enough wire to bend and secure around the edge 

of the frame.


STEP 8


Cut a length of 0.4mm wire (long enough to bind 

and stretch across the frame) and use one end to 

bind the 'mouth' unit to the other side of the frame.


STEP 9 (Wiring in Nose & Eyes)


Cut more lengths of 0.4mm wire and secure 

the nose/eye unit in place within the frame, 

plus secure the base of the 'nose' to the centre 

top of the mouth (leaving wires projecting out 

on each side).


STEP 10 (Nostrils)


Curl tight spirals with the projecting wires and 

flatten on each side of the nose, to create the 

'nostrils'.


STEP 11 (Teeth)


Use the remaining 0.4mm wire leftover from 

the 'mouth' binding, to thread with seed beads 

and secure around the opposite side of the frame. 


STEP 12 (Optional decoration)


This is where you can let your creative juices 

flow! But, here are some of my suggestions! 

Why not wire in more seed beads to add extra 

colour? Or, perhaps ... add a couple of larger 

beads, or semi-precious chips within the frame? 

Or, create some wire shaped motifs to 

fill in any gaps? 

The options are, as always endless!


Et voila!  Above, is my finished masked pendant! 

I think it has a Japanese Samurai flavour. 

However, many variations are possible using 

this basic technique.


I hope that you will be inspired to have a go at 

making your own, and if so, please DO share on  

my FACEBOOK page, I would love to see your

designs!


HAPPY WIREWORKING!


Monday 6 September 2021

Wednesday 1 September 2021

WIRE TREES


With environmental issues being so important,

the biggest plants on our planet, namely TREES,

are especially topical and special. As they produce 

oxygen, store carbon, stabilise soil, provide 

wildlife habitats, plus not to mention, give us 

the raw materials for tools, materials and shelter!


And so, on the subject of Trees, I am delighted to 

announce that this:

Friday (3rd September) at 6pm

I have been asked by CHALMERS GEMS to 

demonstrate how I create Wire Trees, not for 

jewellery making, but for small scale sculptural 

pieces.

The demonstration will be live on Chalmers Gems

Facebook page. So please feel free to join 

us to share in this fun, wirework experience and

check with Chalmers Gems when they go

LIVE on this link.


Chalmers Gems supply a very comprehensive

choice of beautiful base gemstones for all your

jewellery needs, plus base stones for the

trees to sit on. These will all be on offer and

ready to purchase on Friday from their website.

Please do follow them on Instagram too, where

they do regular 'live' events and sales!


In the past, I have created wire trees using glass

beads or crystals and set them onto to wood

slices, however, when you're using gemstone

chips for the 'blossom', a gemstone base will 

give the tree that extra elegance, plus add an

essence of quality, rarity and beauty. Also, if 

you're into the healing aspect of 'stones', then 

it adds extra symbolism and energy to your 

hard work!


Above, is a tree created on a beautiful raw piece 

of black Tourmaline from Chalmers Gems

The blossom is a mixture of gemstone chips: 

Garnet, Moonstone and Peridot.


The base on the tree above is, Chrysocolla and

the blossom is a mixture of multicoloured Beryl.


This smaller tree (above) is wired onto a Fuschite 

gemstone base with Amethyst blossom.


A full instructional video is available on my 

YouTube Channel: Linda Jones Wire Jewellery. 


Thursday 5 August 2021

The Art of Simplicity

"Simplicity is the keynote of all true elegance." Coco Chanel

"Simplicity is the ultimate form of sophistication." Leonardo da Vinci

Those two quotes resonate with me when I'm designing. The ability to simplify, 

can help you to create a stronger visual piece, as you're eliminating the 

unnecessary 'fluff', enabling the necessary to speak! Just as I'm sure, you've 

often heard the phrase: Less is More!

So carrying on with that vibe, I thought I would share the simplest of tutorials. 

This will help if you haven't picked up your pliers in a while, or if you're new 

to fiddling with wire! 

As most of us are going to be enjoying a 'staycation' this year, or perhaps are 

quarantined with too much time to fill, this summer project just requires some 

wire that's not too thin: I have used 1.6mm aluminium, because it's soft, light 

and very easy to manipulate.


STEP 1


Depending how large you wish your pendant to be, 

find a circular object to wrap your wire around, thereby

creating a full circle. Cut the wire off from the spool, 

leaving the ends overlapping on each side.


STEP 2


Place your round nosed pliers at one end and create 

a circle.


STEP 3


Hold the circle in your flat nosed pliers and continue

curling the wire around into a spiral, leaving a small

projecting tail at the very end.


STEP 4


Using your round nosed pliers, curl the projecting 

tail into a link at the top of your spiral.


STEP 5


Place your spiral onto a steel block and gently hammer 

to flatten and work harden.


STEP 6 (optional)


If like me, you have used a thick gauge wire, you can

choose to texture the surface with the small dapping 

head of the Whammer hammer. (If the wire curls up, 

flatten it back down with the nylon head).


STEP 7


Depending on how simple you wish to make the 

pendant, you can just secure 0.4mm wire around 

the top two wires. This keeps it from misshaping, 

or opening up when worn.


STEP 8 (optional)


If you wish, you can continue weaving whatever 

0.4mm wire you have left ... or, you can wire in a bead, 

or small seed beads within the spaces at this stage.


STEP 9 (central bead feature)


You can choose to leave the centre of your spiral

(A) as is, or (B) glue in a small flat backed crystal, 

or as above (C) and following on with steps 10-13, 

thread a bead with 0.8mm wire, forming a small 

spiral at one end.


STEP 10C


Flatten the spiral onto the bead, pulling the excess 

wire straight at the back.


STEP 11C


Thread the bead stem through the central hole of 

the spiral (with the bead on the front side).


STEP 12C


Create a spiral with the 0.8mm projecting wire (at the back of 

the bead), bringing it tightly up towards the centre of the spiral.


SPIRAL 13C


Flatten the small spiral against the back of the bead and 

centre of the pendant. (*For extra security, you can always 

add a dab of glue to prevent the bead from moving around.)


SPIRAL 14


Et voila! A very simple necklace pendant that just

needs popping onto a chain with an extra jump ring!

This design also looks great created as earrings!


________________________________________________

During this very strange, unsettling and 

difficult year, I have created many pieces 

of jewellery and if you follow me on 

Instagram(lindajoneswirejewellery) you will 

see them all and more!

So if you need a spark of inspiration for 

more summer pieces to make, below is a gallery 

of my latest work. 

I hope that you enjoy! 


HAPPY WIRE WORKING! 

It's good for your wellbeing!

Please do also feel free to ask for any advice 

with techniques, or project suggestions. I 

always love to help if I can!