wont be continuing, with what I hoped was going to be a
series of Wire Jewellery shows on the Craft Channel!
I can't go into all the details, as I don't have any insider
knowledge, except to say that the Channel were very suddenly
faced with their main investor pulling out and are now hopeful in
getting a new backer, so that they can resume with more
jewellery shows! So until such time, ... I will have to go
job hunting again ... Any offers, will be gratefully considered!
As life is a bit prickly this month (and we're heading into
the festive season) here's my latest Christmas necklace,
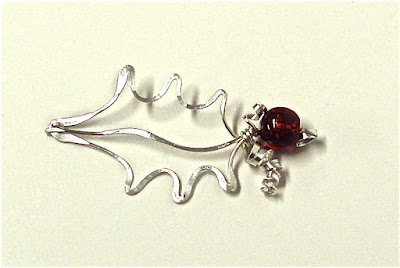
involving making a spiky holly leaf!
So, ding dong merrily on wire! Here's how to create a Xmas
HOLLY LEAF:
STEP 1
Working directly from a 0.8mm spool of wire, place your round
nosed pliers about 1" (2.5cm) from the end, and form a curve.
Use your chain nosed pliers, to pinch the wires at the tip of the
curve. Then, form more curves with a longer one for the pointed
end of the leaf (as shown above).
STEP 2
Repeat the same, to create the opposite side of the leaf frame.
Cut the wire from the spool leaving a tail projecting.
STEP 3
To secure the frame, wrap one wire around the other.
STEP 4
tips of the frame, plus the end of the projecting wrapped wire
(where arrow shown).
STEP 5
Cut approx. 6" of 0.8mm wire (or, at least enough to go down the
centre of the leaf with about 3" extra). Secure the wire around the
top, with one part becoming the central vein of the leaf and rest
projecting out at the top.
STEP 6
*(If you wanted to thread beads onto this central wire, this is the
time to do it). Or, just secure the end around the top. As for the
projecting wire, use your Whammer to flatten on a steel block
(except for the very end tip).
STEP 7
Use the tips of your round nosed pliers to curl the hammered
wire at the top of the leaf into decorative curly coils.
STEP 8
Thread a bead onto the central stem and form a link at the
top of the bead.
That's your holly leaf made and it's now ready to put onto a chain!
However, I am going to give you, two projects in one ... so, read on ...
STEP 9
You can suspend the holly leaf from a flat bauble decoration:
create this, by wrapping 1mm wire around a circular mandrel,
leaving the ends to overlap by about 1cm-ish.
STEP 10
Using the tips of your round nosed pliers, curl the very ends of
the circle into links and twist them 90 degrees to the frame.
STEP 11
Decorate the inside of your 'bauble' decoration with spirals, or
threaded beads. Get creative and go freestyle! Here's what I did ...
STEP 12
I created one main 'S' shape to fit my circular frame ...
STEP 13
... and then kept adding and binding in more where necessary,
using 0.4mm wire to secure where they touched. You could use
more beads or coloured wires ... just fill and decorate the inside
of the circular frame.
STEP 14
Finally, suspend it from a chain or ribbon (as a tree
decoration!) or, as a lovely long pendant necklace!
I hope you can use this inspiration to make your own
decorative, festive jewellery!
(Psssssst! Bookings for Wire Jewellery Workshops for all abilities
make perfect Xmas presents! Go on, treat yourself, especially
if you live near Tonbridge in Kent!)
www.wirejewellery.co.uk


Very nice! Great for this Christmas. Thank you. Good luck with the work, see if a new sponsor appears soon
ReplyDeleteThanks, Lna! Happy Christmas to you! x
DeleteThanks for sharing, nice post! Post really provice useful information!
ReplyDeleteFadoExpress chuyên dịch vụ chuyển phát nhanh siêu tốc đi khắp thế giới, nổi bật là dịch vụ gửi hàng đi mỹ, gửi hàng đi úc uy tín, giá rẻ.