Tuesday, 29 May 2012

*Diamond Jubilee*

If you live in the U.K. there is just no escaping from the festivities coming up this weekend, marking 60 years of the Queen's reign!  Not only that, we've got the Olympics to look forward to in July ...  so on that note, I've designed a range of:
JUBILIMPIC JEWELLERY
which you can create for yourself, family and friends, to get yourself in the mood and spirit of these most historical occasions!


The base ingredient of this souvenir
collection is a Union Jack Button supplied
by BEADS DIRECT, together with a few
other findings that you will find on their
online catalogue.  This is my homage to
the Pearly Kings & Queens of London
(albeit a sideways nod to royalty!).


JUBILIMPICS NECKLACE
Materials required:  5 Union Jack Buttons, 5 x 8mm silver Czech glass crystals, 1 silver coloured flower bead cap, 1 silver chain and some 0.4mm silver plated wire.


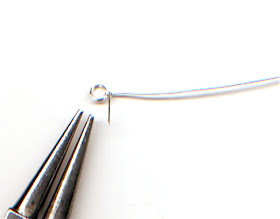
1.  Cut approximately 8" (20cm) of 0.4mm wire. Place your round nosed pliers about an 1" (2.5cm) from one end and curl the wire twice around to create a double link.  Wrap the excess around the base of the link to form a wrapped loop.  Cut off any excess with your cutters.

2.  Thread the end of wire through the BACK of the button through one of the holes, followed by a 8mm silver fire polished crystal bead.

3.  Pull the wire, so that the double wrapped link sits at the back of the button.  Thread the wire back through the second hole, positioning the bead in the centre, above the button hole.

4.  Thread the end of the wire through the back of a second button, followed by a silver crystal bead.  Don't leave any spaces between the buttons - make them slightly overlap.

5.  Repeat as before, threading a third button from the back with wire, but this time add the bead cap, followed by the crystal bead ...

6.  Repeat, as before, threading two further beads and buttons to finish the centrepiece of the necklace. 

7.  Use your round nosed pliers to create a double wrapped link at the opposite end. (Above: you see the back of the piece.)


(A) As an optional extra ... create a small
beaded garland for your centre bead,
by cutting approx. 3"  (7.5cm) of 0.4mm
wire and threading with about 15 seed
beads (as many as required to sit snugly
around your 8mm crystal).

Push the beads to the centre of the wire
and cross the wires over to form a beaded
loop.


(B) Re-thread the end of one of
the wires back through one of the last
beads to create a beaded circle.


(C) Place the beaded circle around the central crystal and pull the wires tight around the bead to frame it.  Push the wire ends towards the button, through the gaps of the bead cap and wrap around the base of the bead cap, between the cap and button.

Now, all that's left to do is connect a chain to each side and it's ready to wear!

JUBILIMPIC BANGLE

To create the bangle, follow steps 1-7 of the necklace, omitting the flower bead cap (or "Tudor Rose" of England!).  Connect beading elastic to each side of the links at the back of the buttons and thread this elastic with a combination of silver crystals and seed beads.  This means the bangle will stretch (at the back) to slip over the hand and will fit a variety of different wrist sizes!

JUBILIMPIC EARRINGS

To make these earrings, cut about 2 x 6"  (15cm) of 0.4mm wire and thread the centre with silver crystal beads.  Push the ends of the wires through the button holes and twist tightly together at the back of the button with your fingers.  Thread the twisted stems with some choice beads and push them upright, so that the buttons sits at right angles to the stems.  Use your round nosed pliers to make wrapped loops out of the projecting twisted wires, ready to suspend from fish hook ear wires.

JUBILIMPIC RING

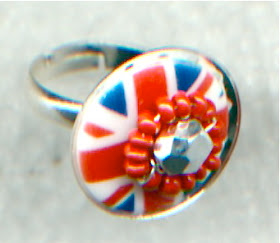
Another simple, quick project to make is a button ring:  just bind this onto an adjustable ring holder.

JUBILIMPIC KEY CHAIN or BAG CHARM SOUVENIR

You will need 2 buttons to make these.  Place the buttons back to back and thread with the crystal beads on each side to secure together as one.  Bind the remaining projecting wire around the beads to frame them on each side and neaten ends.  Cut a length of 0.8mm wire and wrap this around the gap surrounding the buttons creating  a large loop and bead stem.  Cut another length of 0.4mm wire and create a beaded circle to decorate the outer edges.  The trigger keyring and chain are perfect for handbags, belt decorations, zipper ornaments, pencil case charms, key holders, etcetrarara ...
*******


I hope this provides some inspiration for some quick makes to help celebrate the summer 2012!  If you don't live in the U.K. and have no reason to create patriotic pieces - just adapt and use coloured buttons instead! 

Psssssst ....

I also designed this
Jubilimpic Pendant,
that can also double up
as Brooch, but not having
a camera and only being
able to scan my pieces -
I couldn't get a good image
of it ... with the jump rings
suspended with red seed beads
around the exterior.
The jump rings do look
quite effective hanging down
on each side creating a sort of
'shaggy dog' look!

The button and flower bead cap, etc .., have
all been wired to a sieve disc with beaded
jump rings attached around the perimeter!

HAPPY JUBILIMPIC WIREWORKING!!

Wednesday, 16 May 2012

SHAMBALLA BEADS

Shimmer & Sparkle with
SHAMBALLA BEADS


If you haven't heard, or seen a SHAMBALLA bracelet by now ... you've either been living on another planet, or locked in a very dark cupboard!

The cult craze for these macrame, disco ball bangles has become the must-have accessory for both men and women, with A-list celebrities parading them on their wrists.  The reason for their popularity is in the clever combination of mixing sentiment and philosophy with 'bling' and casual style.

The word SHAMBALLA is mentioned in various ancient Buddists texts, referring to a spiritual zone or mythical kingdom that is inhabited by only the most enlightened souls.  Buddists believe that there is a 'shamballa' in all of us, a special quality or intuition, that provides us with inspiration, meaning and direction, as well as inner strength and determination whenever we need it ...  Therefore, wearing the bracelet is a perfect way to celebrate your individuality and spiritual growth, reflecting the holistic spirit of a centred mind, body and spirit inspired by these ancient Buddish traditions.

So, if you want to make your own personal version, you'll find lots of TUTORIALS on the web and an amazing array of Shamballa style beads.  However, my personal preference of where to purchase these beads is without any doubt, from BEADS DIRECT!  You are spoilt for choice on their site and not only that, they also provide you with free INSTRUCTIONS.

Recently, I was lucky enough to be approached by the lovely Claire Humpherson from Beads Direct, to do some brainstorming, on how I would integrate shamballa style beads into wire jewellery.  Now, I never refuse a challenge! So armed with the selection of beads below,


(3 of them 14mm heart shaped and the rest, 10mm rounds) I came up with a few 'Shamwireballa' designs that I hope will inspire you all to pick up your pliers!


For this first pendant design "GUNMETAL GLAMOUR", I used the GUNMETAL SHAMBALLA HEART and 2 x 10mm SHAMBALLA style beads (... and a few black crystals, 0.8mm wire and some chain ... etc...).


Here's a close up, to show you
how the heart bead is threaded.
As it's drilled horizontally,
I've threaded and created side
links and then suspended the
wire hangers to the top and
bottom to provide elegance
and length to the pendant.


I also had a turquoise version of this HEART and tried another, much simpler design of suspension.

By threading the heart with 0.8mm wire, I created a 'fish-hook' at each projecting end and bent the wires over to the top centre of the bead until they crossed over.  The small crystal drop bead dangling above the heart, holds and secures the crossed over wires and acts as a top suspension link for a chain (cord or ribbon).  And the matching round beads make fantastic earrings ... suspended off chains, they sparkle and shimmer to make anyone wearing them look like an A-list celeb!

These heart beads are also great for making rings!  Here's a version of my wrapped wire 'squiggle ring' with the GOLD SHAMBALLA HEART bead secured to the front. 


Above, is another attempt at a necklace pendant, using the 10mm round beads in silver and gold. I found that apart from crystals, the sparkle of the shamballa beads also worked well in combination with pearls.

The beads just cascade down the centre of the necklace and add sparkle and movement to the overall piece.


You could also wire wrap them to form the centrepiece of a necklace ... to reflect the original chinese cord knotting of the bracelets. Instructions for this can be found on an old blog post dated Sunday 20th March 2011 ...

And finally, when you've just got one shamballa bead left in your stash ... looking all lonesome and left-out ... here's what you can do with it!  Get some 0.8mm wire and a pair of round nosed pliers and have a play at making a curly-wurly chain links!


I HOPE I HAVE STIRRED YOUR CREATIVE JUICES TO HAVE A GO AT USING SHAMBALLA BEADS WITHIN YOUR NEXT WIREWORK DESIGNS! 

Please feel free to share your Shamwireballa designs on my FACEBOOK page soon ...


Thursday, 10 May 2012

LINDA SINISH profile

Double Helix Copper Bracelet by Linda Sinnish


FEATURE ARTIST
****************

LINDA SINISH

****************

It gives me enormous pleasure to introduce to you, the work of talented wire jeweller - Linda Sinnish! I recently stumbled across her beautiful work ... as one does, these days ... through her chatty online BLOG and was enchanted by her passion and flair.  I'm sure you will enjoy catching up with Linda's work too, by reading her recent interview for the Guild ...

Q.  Tell us a little about your background?

I was born on the south side of Baltimore City, Maryland, USA.  This is an industrial area with little or no inspiration.  Lots of row homes, sidewalks and streets lined with parked cars.  Usually, there was a laundry mat on a corner and a mom and pop neighborhood grocery store nearby. Life for most adults was about survival and there was little money or time to encourage children to be creative in the arts.  So, it's not surprising for me to say that I didn't have art in my blood, or occupying my time.  My imagination however was very active and full of dreams and questions.

Q.  What brought you to creating and designing jewellery?

Fast forward to my adult years and I married an artist.  Go figure!!  Destiny in the arts was not going to be avoided.  At first I couldn't understand his passion for putting paint on canvas, or how he could stare endlessly at art in galleries.  But, the seed had been planted.  I began to look forward to visiting galleries and museums in the Washington, DC, New York and Pennsylvania areas.  Little did I know that the creative seed had taken root and it was growing ...

The dull and boring cold months of winter sparked a need in me to get out and do something.  I enrolled in many different types of art mediums.  The goal was originally just to have fun and meet new people.  I explored writing, pottery, oil and acrylic on canvas.  These were fun and I enjoyed each project, bu I did not master them.  Then it happened!  Oh so unexpectedly.  I decided to take a basic introductory course in jewelry and learned the almighty crimp to seal those lovely beads and accents to make my first bracelet.  I was hooked!  It's hard to put into words the extra excitement I felt while making jewelry.

Remember earlier, how I mentioned that I have an inquisitive mind?  Well, I wanted to know how to make those accent metal links.  I was sure there was a way.  Behold!  WIRE!  How exciting!  I couldn't get enough!

Q.  Do you have any formal training?  Or are you self-taught?

My training came to me in many forms.  It started with craft store classes.  My mind kept telling me that I could learn to make the spacer beads that snuggled between the crystals, so I read and practiced the techniques in jewelry magazines, books and watched DVD's.  One day, I was reading the class schedule for my local community centre and nearly flipped out, when I discovered wire classes being taught by Jeanette Blix Ryan.


Q.  What motivates and inspires your designs?

I sometimes ask myself "what would happen if ...".  Then I start to twist the wire and let it direct me.  I try to let my logical mind take a break and let the intuitive, creative part of my mind go wherever it wants.  I must admit that sometimes the final project isn't attractive.  I do think that my best pieces allow both my right and left mind to work together to create.

Other motivators are other wire jewelry artists.  They are fantastic and I often wonder how they came up with their designs.  When I attempt to learn from them by recreating their technique, the final project often takes on a design of its own.  It can be magical!.


Q.  Have you got a favourite design and if so, why?

Right now I'm focused on pendants that are being wire wrapped.  I especially like incorporating twisted wire into the design and a small 'rose' made from wire.  The 'rose' is a simple knot of wire that bunches up on itself instead of lying flat to form a spiral. Once the rose is antiqued, it really adds to the dimension and takes on a whole new look.

My all time favorite wire technique is the double helix.  It is time intensive and the wire measurements must be exact for the links to form properly.  Coils of wire surround a core wire and then it is curled around a mandrel.  Two of these components interlace to form a link.

Q.  How do you promote and sell your work?

I believe marketing is a large part of the jewelry business.  You need to let people know that you exist in order for them to know that you are selling it.  So I write a blog:


Plus, I post pictures and comments on Facebook and Pinterest.com.  Of course my business card is everywhere.

I belong to a co-operative gallery, WV Highlands Artisan Gallery in Davis, West Virginia.  I am very fortunate to have been juried into this co-op.  It's located on top of a mountain in a small town that is 1/4 mile long, but located near several ski resorts.  One thing lead to another and Mountain Made Gallery accepted my jewelry on consignment in the nearby town of Thomas, West Virginia.  I have a lot of fun when I put my tent up at the Elkins Farmers Market  during the warmer months, where we jump out of our shoes each time one of the tourist trains whistles blow loudly, very, very loudly!!  I also have a shop on Etsy, to enable my lovely tourist customers to continue to buy from me.

Q.  Do you teach your craft?

Oh, how I love to teach!  It's so much fun!  I don't consider it to be work.  It's more like a party of people making pretty things.  Before I moved from Virginia, I would run regular weekly classes in my studio, as well as teach at the local bead shop.  However, since my move to the Appalachian Mountains of West Virginia, I've been busy getting my jewelry into shops.  The future will certainly have classes - I just love the happiness it brings to everyone! 


Q.  Have you any special advice for others starting out in jewellery making?

YOU DON'T HAVE TO BE BORN AN ARTIST, TO BECOME ONE ~ Me. 

Enjoy yourself and have fun!  Don't be hard on yourself. Those first attempts with the pliers might feel cumbersome, but with each twist and turn, your hands will improve and before you know it, you will have forgotten the beginning 'wonky' pieces of jewelry.

I would suggest that you keep those first pieces of jewelry.  Especially those that are 'wonky'.  You'll then be able to see just how much you've improved!  This is a quote that is on the bottom of my blog:

" YOU HAVE TO START SOMEWHERE!  BECAUSE IF YOU WAIT UNTIL EVERYONE THINKS YOU'RE GOOD, YOU'LL NEVER GET STARTED" ~ Me (4/17/11)


Q.  What are your future dreams and aspirations?

"DREAMS ARE THE THINGS OUR FUTURE IS MADE OF". ~ Unknown.

I'm always setting goals and taking action to accomplish them.  Never stop learning! I want to learn more techniques.

I'd like to get published.  It just seems like the next logical step.  This might begin with a tutorial in a magazine and then evolve into a book.

I want to develop a website.  I currently have a blog, but not everyone understand a blog.  Some people need and understand the online brochure of a website.

************************************************************************************

There is no doubt in my mind, (and I'm certain everyone else will agree having read this feature) that Linda's dreams will all come true, as she emanates true artistic passion and love of her craft!


Friday, 4 May 2012

ARROW NECKLACE

As you may know from my last blog, I have been very busy working up new KIT designs and projects using feathers.  So to keep the theme going,  I thought I would share my:  

ARROW NECKLACE 
tutorial with you!  This design could be construed as 'Cupid's Love Arrow' or, you could wear it proudly to keep your life moving in the 'Right Direction' ... OR ... if you have a daughter, grandchild, niece, or know anyone who loves the band, 'One Direction' - here's the perfect fan merchandise!!

The MATERIALS required are:  1 x feather, 1 x focal bead (with a hole that can thread through double lengths of 0.8mm), 0.8mm (20-gauge) wire and some ready made chain.
As for TOOLS, you will need the usual suspects - Round, Chain and Flat Nosed Pliers, Wire Cutters, Hammer & Steel Stake, Scissors.

1.  Cut about 6" (15cm) of 0.8mm wire.  Place the tips of your round nosed pliers at the centre of the length and fold in half.

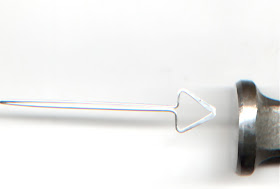
2.  Using your flat nosed pliers, bend the wires in towards each other to create a triangle at the centre of the wire.


3.  Using your chain nosed pliers, straighten the stems of the projecting wires so that they run parallel from the centre of the triangle. 


4.  Once you're satisfied with the triangular end, give it a 'stroking' and flattening with your hammer on a steel stake to work harden.

5.  Put your arrow frame aside for a moment and create 2 even coils of 0.8mm wire - just like you would create jump rings.


6.  Thread the first coil onto both projecting wires and push this right up to the triangular arrow head, followed by your bead and finally the second coil ...


7.  Depending on the feather you're using - if it's very large, or has lots of whispy bits at the top end - pull these off from each side using your fingers and cut the central stalk of the feather down to shorten.

 8.  Push the central stalk of the feather into the coil and use the tips of your chain nosed pliers to carefully squeeze (crimp) the last ring on the coil to secure the feather in place.  (*If you're worried that the feather could fall out, just add a dab of Superglue around the edge of the coil for extra security!).


9.  Using your round nosed pliers, curl one of the extending wires into a link (cutting off any excess wire) and create a spiral with the other projecting stem.

10.  Using sharp scissors, cut a 'V' into the back of the feather.


11.  Create or use a ready made jump ring to suspend a chain from the link you created in step 9.

12.  Measure the chain to the length desired, minus 1" (2.5cm).  Connect the opposite end of the chain with a jump ring and a fish hook - with a long stem.  (*You don't have to have this long stem, you can just add a ready made clasp ... it's up to you!).

13.  ... but, IF you leave a long stem you can spiral the wire up, holding it firmly in your flat nosed pliers as you do so, to obtain a more decorative fish-hook clasp!


And now all that's left to do is ... hook the clasp into the end of the arrow head and your necklace is complete!


Here's a version using gold plated wire, where the clasp is at the back of the necklace.

This was my first attempt ... more tribal and rustic with black cord!

And even if you have a very plain, white feather ... you can jazz it up by putting specks and spots on it with a metallic pen!

**********************************************************************************
HAVE FUN MAKING YOUR OWN VERSION!!  and please DO post them up on my FACEBOOK page to share!

HAPPY  WIREWORKING!!
... and just incase you don't have a feather, or, a focal bead that will thread through the doubled O.8mm wire - here's an alternative idea:  Follow steps 1-4.  Then cut one more length of 0.8mm wire and place this by the arrow head and along the parallel stem wires and bind it tightly together with 0.4mm wire just under the arrow head.  Then use the rest of the 0.4mm wire to secure beads onto the stem - binding the wire around the stem after each bead has been added.  Finally, check what length you wish the ends to be and cut off any excess.  Now, hammer the ends of the 3 protruding wires to spread and "mushroom" them out.  Then all that is left to do is to suspend it from a chain!!