Sunday, 27 February 2011

The WireWorkers Guild

The next post, will be the publication on
M A R C H 1st
of THE DESIGNER CHALLENGE
entries ...

You've still got a few more hours to
enter, by emailing your JPEG images
to: linda.jones@wirejewellery.co.uk


So watch this space .....

Saturday, 19 February 2011

The WireWorkers Guild


REMEMBER
!!
REMEMBER
!!


DON'T FORGET
!

TIME IS
RUNNING
OUT
...

GO ON!

HAVE A GO -


at the
WWGuild:


D E S I G N E R
C H A L L E N G E

~~~~~~~~~~~~~~~~~~~~~~~~~~~
Theme:
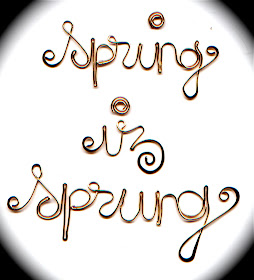
"SPRING IZ SPRUNG"

All entries must be emailed to me by the end of
F E B R U A R Y
and I will publish them all at the beginning of March.

The email to send your JPEG images and piece description is:

linda.jones@wirejewellery.co.uk

GO ON, have a GO!
Make it your personal mission for this month!

<%>:::<%>:::<%>:::<%>:::<%>:::<%>:::<%>

And .... NOW ... what to do with those left
over pieces of wire and loose sprinkles of
odd, orphaned beads .... when you've got
30 minutes to spare?

Here's a Pendant project, which I've named
R A N D O O D L E D O M
(you've guessed it! - as it's completely based on a
random doodle of wire!).
However, you could turn it into a brooch, earrings,
focal piece of a ring ... just use the basic idea and improvise to
your heart's content!

TO GET STARTED:
You will need some 0.8mm wire (but 1mm,
1.25mm or 1.5mm gauge will do just as well!), also
some 0.4mm wire, a sprinkling of small beads,
round nosed and flat nosed pliers, wire cutters,
hammer and steel stake.


1. Using your round nosed pliers, create a circle at the end
of your wire.


2. Create a RANDOM shaped spiral, bending the wire
into angular curves with your flat nosed pliers and
fingers.


3. Depending on how big you wish to make the overall
pendant, cut the wire at this point.


4. Bring the end of the wire through and over the
outer frame.


5. Place your random spiral onto a steel stake and
'stroke' hammer to flatten and spread the outline -
however, don't hammer the top wire, or, where it crosses
the frame, as you will weaken it!


6. Use your round nosed pliers to create
a double link (or wrapped loop if desired).


7. Cut a long length (approx. 10" /25.5cms) of 0.4mm
wire and find one stray 8mm bead and a random
selection of seed beads that have just been lurking at
the bottom of a pot for years ... Attach the thin wire
to the centre circle of your unit.


8. Thread the largest bead onto the wire and secure
it onto the centre circle of the unit. Now thread on some
of your little, lonely seed beads ...


9. Continue threading and wrapping the beads
and wire around the frame of the unit in a very
random fashion. Don't think too hard about what
your doing ... just be - instinctive!


10. I instinctively stopped adding beads here - and
cut and secured the end of the wire on to the side of frame.
Cut off any excess and neaten the end.


11. Cut another length of 0.4mm wire and attach
to the base of the unit and begin weaving it
in and out of the frame, as before - but, without
adding any beads.


12. Continue weaving and wrapping the wire
around the frame and when you've had enough ...
cut the excess off with your wire cutters. Remember
to neaten all the ends, so that there are no spiky
bits protruding.


13. Et 'voila'! You can leave it like this and suspend
it from a chain, ribbon, cord, choker ring, key ring,
pencil case zip, save it as a Christmas decoration,
put it on a card, etc... It's just a bit of fun!


14. AND ... if you wish to make it a little more
randomly wiggly: just place the tips of your
round nosed pliers on the centre of the bare
wires and TWIST to create the zig-zag effect.

<%>:::<%>:::<%>:::<%>:::<%>:::<%>:::<%>:::<%><%>:::<%>

Have fun experimenting with this idea and after
you've had your practice-run with left-over beads,
try making it with semi-precious chip beads on
sterling
silver ... it can be great statement pendant!

Sunday, 13 February 2011

The WireWorkers Guild

To learn how to
create the

H E A R T
KILT PIN
(opposite)


Go to:


GUILD OF

JEWELLERY
DESIGNERS
and link
to:
http://www.guildofjewellerydesigners.co.uk/index.php?option=com_content&view=article&id=919:valentine-pin-by-linda-jones&catid=18:jewellery-making-techniques&Itemid=55


±±±±±±±±±±±±±±±±±±±±±±±±±±


Just released this month is my E A R R I N G S project book - why not treat yourself to a personal Valentine gift - it's available on both amazon dot co dot yewkay & dot com!


Even though this book is a compilation of projects from previous books, it's packed with design inspiration and new techniques, which in turn will hopefully act as a trigger for your own personal ideas ... Although the projects are all recipes for Earring designs, the photography and images reveal co-ordinated necklaces and bracelets. So there's something for everybody!

I will be demonstrating and promoting the book on BEAD.TV quite shortly,
showing how to create some of the earrings, such as:


CHARM
CASCADE


CUPID
HEARTS


EGYPTIAN
CHAIN
PYRAMIDS


PINK
DAISIES


FALLEN
LEAVES


So if you haven't subscribed to BEAD.TV yet ... now is the time to think about it!
I will also be demonstrating how to create your own unique ear wires,
plus different
techniques for making headpins, both plain and functional,
as well as decorative ...

http://www.bead.tv/index.asp


Here's a little
'taster' of
the styles I
will be demon-
strating ...


**************************************************************************************

Below are a few more of the projects included within the book -
I've tried to supplement as many variations and styles to please
all tastes and personalities!


FISHY FUN

Great to make for
a friend who has
a PISCES star sign ...


FRAMED
BEAD
EARRINGS

These have a very 'retro/
vintage' feel, which makes
them perfectly
in
-trend for 2011!


BIRTHSTONE
LADDERS

You don't have to
make them with
gemstone chips -
colourful beads
look stunning too!
Increase the
length to make
a matching bracelet!


WIGGLY
WIRES

This simple
wiggly chain
link can be
filled with
wrapped beads
or left uncluttered
as shown.


TIMELESS
TASSELS

Not only do beaded
tassels make great
embellishments for
jewellery - clip them
on to handbags, zips,
cushion corners and
curtain tie-backs ...


:0) ~ :0) ~ :0) ~ :0) ~ :0) ~ :0) ~ :0) ~ :0) ~ :0) ~ :0) ~ :0)


I DO HOPE
THIS has
PROVIDED
SOME
'BEADFOOD'
FOR THOUGHT!

Sunday, 6 February 2011

The WireWorkers Guild


Please put
your hands
together for
this week's
'wire-wonderful'

FEATURE
ARTIST


ALISON BICKELL


Who is also the owner and
manager of her own shop
called:

"TREASURED FOREVER
"
in Tavistock, Devon.


So read on ...
to hear how Ali became a
wire and bead passionata ...

**********************************************

WHAT'S YOUR BACKGROUND,
HOW DID YOU GET INTO MAKING
JEWELLERY?

My professional background is Hotel and
Catering, front and back of house. I started
making jewellery about 5 years ago.
I have
come a long way since then!


ARE YOU SELF-TAUGHT OR HAVE YOU
ATTENDED ANY COURSES?

I am self-taught. However, I have attended
a wire-wrapping course at Shiney Rocks in
Bristol and this did open a whole new media
up for me to explore. I was also inspired by
one of your previous featured artists -
Sue Mason-Burns of Kiwi Creations - who
has been nicknamed Wire Woman. Her work
is amazing and so vibrant.


WHAT THEMES OR IDEAS INSPIRE YOUR
JEWELLERY DESIGNS?

Is it too weird to say that "the beads and wire talk
to me"? I also take my cue from NATURE, it puts
the strangest colours together and they work!


HAVE YOU GOT A FAVOURITE DESIGN AND
WHY?

I don't have a favourite design - I have phases. These
vary from day to day. I frequently seek new ideas from
my fellow jewellers and always ask before I "steal" an
idea!


HOW DO YOU SELL AND PROMOTE YOUR WORK?

I am very lucky to have my own shop in Tavistock, Devon,
called TREASURED FOREVER. I regularly update my
days creations on Facebook, where in turn I have made
some wonderfully supportive jeweller friends - thank you
SHAE's.


WHAT ARE YOUR ASPIRATIONS AND GOALS FOR THE
FUTURE?

Jewellery making started as a complete hobby for me and I
was very fortunate to be able to turn it into a business.

My 'goals'? I guess that would be to evolve and improve.
I want to be a success, but most of all, I want anyone who
wears a piece of mine to feel - SPECIAL!

Thursday, 3 February 2011

The WireWorkers Guild


Are you sitting
comfortably?

There are just
T H R E E

things that I
wanted to
announce:


ONE
: Designer Challenge Competition
open to all WWGuild members

TWO: Recommendation of a fantastic
eco-friendly packaging company,
called:
http://www.tinyboxcompany.co.uk/

THREE: A Valentine Card project, that's
fun and quick to make!

************************************************

The DESIGNER CHALLENGE theme is:

"SPRING IS SPRUNG"

R U L E S:
(A) You MUST be a member of the Guild to
apply ... just enroll for free, if you're not already!
(B) Design and create a piece of wire art -
be it jewellery, an accessory or sculpture, using
the title "SPRING IS SPRUNG"
as best befits your creation.
(D) Send 2 JPEG images of your piece by
email to: linda.jones@wirejewellery.co.uk
by March 31st 2011 with a description of
what inspired you and the materials and
techniques used.

There are NO winners, but all entries will
be published in a Gallery of work on
The WireWorkers Guild blog in early
April and you can 'plug' and promote
your suppliers and websites with your
entry.

It's a great personal challenge, so I do hope
you'll all consider giving it a bash! Beginners,
intermediates and advanced wireworkers alike!
*******************************************************


And now for my second announcement:
I just have to let you know how pleased I was with the
recent packaging products and service I received from:
THE TINY BOX COMPANY.

You might have heard of the name, when in 2008 they
appeared on the television show: 'The Dragon's Den'
and got financial backing from two of the
millionaire dragons: Peter Jones and Theo.


The heart shaped tin box at £1.20 is my favourite and
so apt for this time of year. I also found yellow swirl
patterned tissue paper at a bargain price and some
wonderfully sturdy boxes for pendants and bangles ...


Take look at:

http://www.tinyboxcompany.co.uk

They also won the 'Small Business Recycler' award
last year. Their
products are all ECO-FRIENDLY
and there is a huge
range of gift, jewellery and
presentation boxes to
choose from, as well as carrier
bags, ribbons and bows ...


Not only are there products totally recycled, but they
are also full recyclable!

*******************************************************

3. Now for the VALENTINE CARD PROJECT.
Feel free to change and alter this to suit the materials
you have at home ...

Materials I used: 0.8mm silver-plated wire, pencil
(or similar cylindrical mandrel), 4 x 6mm bicone crystals,
2 bugle beads, 1 x 4mm bead, red ribbon, backing card or
paper, blank greetings card, double sided tape.
Tools: Round, flat and chain nosed pliers.


1. Cut approx. 7" (17cms) of 0.8mm wire. Find
the centre and wrap this around your round nosed
pliers to form a central loop.


2. To create the heart frame: place a pencil - or similar
cylindrical mandrel on each side of the central loop and
bend each wire back down until they cross over each other.


3. Begin threading each projecting wire with one
of your 6mm bicone crystals. (If you use small
seed beads, you can thread the entire frame).


4. Once the beads are threaded onto the frame,
secure one wire around the other. Now thread
the 'working wire' with a small 4mm bead.


5. Using your round nosed pliers, create
a curved end to your 'working' wire and push
the 4mm bead into the curve.


6. Begin wrapping the outer perimeter of the
4mm bead with the wire, framing it as close and
completely as possible. Using your flat nosed
pliers, hold the edge of the wire and continue
spiralling it in towards the base of the heart frame.


7. Once the bead is spiralled up to the base of
the heart frame, flatten it at the centre.
Using your flat or chain nosed pliers, twist the
loop at the centre of the heart frame 90
degrees. (This is totally optional. Alternatively,
you can suspend a bead from this point).


8. Cut a piece of ribbon and tie it at the centre. Cut
the sides to fashion and push the projecting wire
through the central knot of your ribbon.


9. To secure to a card, pierce a hole
in a piece of card and push the projecting
wire through. Bend the wire back and tape
at the back of the card. Secure this card
with double sided tape to a blank greetings
card and embellish as desired ... !!